GIFs look really cool but they also look difficult to create – the truth is they are really easy to use in PowerPoint. Everyone expects PowerPoint presentations to be really professional and to have all the latest ideas and transitions but no one ever tells you how they create these impressive slides. One of the most common elements that are being used in presentations now are GIFs, these are essentially moving images that are essentially like mini videos, they have no sound and are usually played on a loop so they are perfect for really emphasising a short message or tagline.The good news is that they are really easy to create and use, in this post i will explain how to find them, create your own, use them in your presentations and give some best practice tips too.
Why Use GIFs in PowerPoint
One of the biggest mistakes people make with presentations is using content just because it looks good even if it is not relevant, it is important to remember that your presentation is to support you while YOU present a message so anything you put in your slides should add to your message rather than distracting from it. GIFs are a great way to grab your audiences attention and as long as the image is relevant they offer several benefits:
- Tell a Story – If a picture is worth a 1000 words then a moving picture must be worth 10000, the right GIF can tell a short story or explain what you are trying to say without a word being spoken.
- Attention Grabber – With the world now almost addicted to communicating in soundbites and short videos, GIFs fit this requirement perfectly so they instantly grab your audiences attention
- Focus – GIFs bring a laser focus to a message by using moving images, text messages and repetition to ensure your message gets delivered exactly as you want it
- Fun – They definitely add a touch of fun and break the monotony of death by slides
How To Add a GIF To PowerPoint
For a lot of people adding a GIF to a presentation might seem like a really complicated job, it is actually really easy and there are 3 main ways that you can find a GIF to insert into PowerPoint:
- Find a GIF in the standard PowerPoint options
- Find a GIF online using specialised GIF providers such as Giphy or Tenor
- Use a PowerPoint Template provider such as ExpertSlides
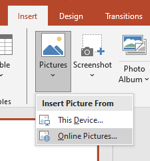
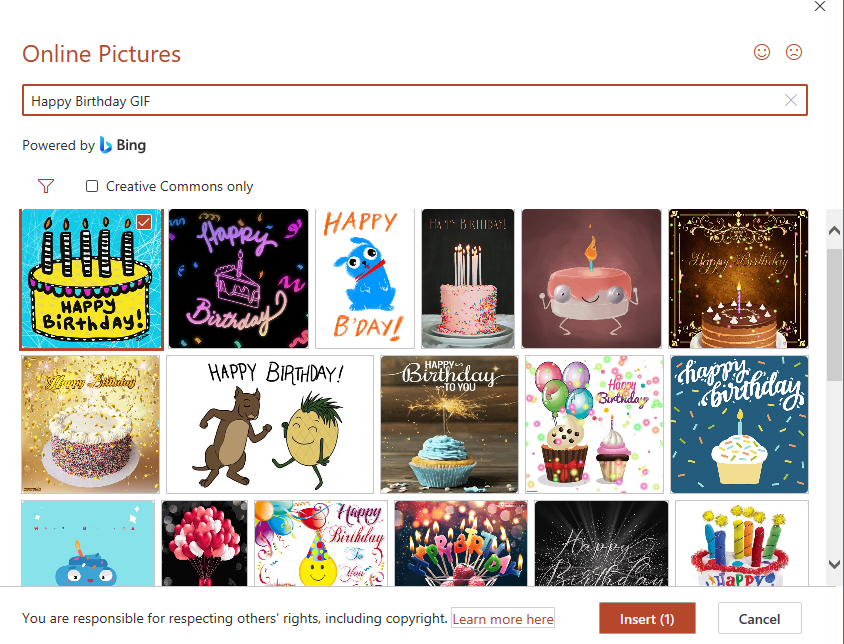
1. Finding a GIF in PowerPoints standard options: This is your easiest option as it is searched within PowerPoint and takes care of the inserting process. The downside in my opinion is that the search options are limited and i you cant see teh GIFs moving in the search function so you have to insert them before seeing how it will look. I find this adds a huge amount of time and makes it really inconvenient, I dont use this option unless I want a really simple GIF.
- In your PowerPoint simply select the “Insert” tab
- Select “Pictures” then “Online Pictures”
- Type your search and include “GIF” in your description
- Once you have found the GIF you want simply click it to select it and click “Insert”


2. Finding a GIF online with Specialised GIF providers: This is probably the most commonly used option as it is what most people are familiar with through using GIFs on their mobile phones, most mobile systems use Giphy or Tenor and both of these have really good online platforms. They both have an enourmous selection of premade GIFs available and Giphy have them with sound also which is a great feature.
- Go to Giphy or Tenor websites and find the GIF you want (you can browse or do a specific search)
- If using for a powerPoint – Right click the GIF and select “Save image as”
- Save to your system as a GIF file type
- Open your PowerPoint slide – Go to “Insert” tab
- Select “Pictures” then “This Device”
- Find the GIF file on your system and double click to insert it
3. Use a PowerPoint Template Provider: If you already use a professional Template system such as ExpertSlides then this is my favourite option. I use ExpertSlides (there are loads of others) for creating my PowerPoint slides as they have 1000’s of premade templates and lots of other features, they also have a section specifically for GIFs and I find the categories and search function really good. The main benefit is that it is already embeded in PowerPoint so the insertion method is really easy:

- Open PowerPoint on the slide where you want to insert a GIF
- Open the ExpertSlides (other providers can be embedded in PowerPoint but others are online)
- Select the GIF section in the menu
- Search for your GIF and click it to insert – you can then format it like any other image
How To Create Your Own GIF
If you are struggling to find a GIF that you want to use you can always create your own. If you want a really specific GIF or even something with a personalised message then you are going to need to create your own one using a GIF creation platform such as Giphy or PresenterMedia, this is a lot easier than it sounds and there are a few ways you can do this depending on what you want
- If you want to use your own video file – Create an account with Giphy or Tenor and you can upload your video, edit it and save it for your own use. I found it difficult trying to figure out if I could add a message to the video so I am not a fan of this method
- If you want to have your own message – I use a platform called PresenterMedia as they specialise in bespoke GIFs and are really easy to use.
- Create an account with PresenterMedia – you can have a free account or a paid one for more options
- Go to the “Custom Graphics” section and select “Custom Animations” from the drop down
- Select a GIF and then edit to add your own message – This can be saved and added to your PowerPoint
Top Tips For Using GIFs
Keep it relevant – I wouldn’t recommend getting too obsessed with having the right GIF as they are meant to be a bit of fun but you do need to make sure that it is relevant to what you are presenting. Either the image itself or the message in the GIF should be relevant to the message you are presenting.
Set it up correctly – Once you insert a GIF make sure you adjust the it to fit your slides and make sure that you select the right play back format. Simply right clicking the GIF will give you options to format the picture. Here you can set the playback mode so it plays automatically or on your click and whether it loops continuosly or just once. These will seem liek small details but can really add to your presentation when done right
Check how it looks – Once inserted make sure you check how it will look during your presentation, it might look great on your laptop but if the resolution is too low and it is being projected onto a 3m wide screen the quality will look really poor and unprofessional. On the other hand if the file size is too big you might not be able to send your presentation to anyone if needed.
Don’t overdo it – When you start using GIFs you might be tempted to use them all the time but resist this urge and keep them simple, a well placed GIF can really emphasise your message but too many GIFs will just become a distraction
Practice, Practice, Practice – This is my best advice for all presentations but when you start adding in moving elements it is even more important to practice to see how everything looks and works when presenting
GIFs – To Use or Not
GIFs can be really interesting, they will engage your audience and keep them interested where standard slides fail, but can also distract your audience if not used well. Don’t overdo it and make sure the GIF you use emphasises your message.
They are really easy to use and and there are loads of premade options available so you can insert professional GIFs with minimal experience. Overall I would recommend that you have some fun and enjoy yourself when presenting and GIFs are a great way to add a bit of humour and engage with your audience
I hope this post helps to take away some of the mystery surrounding GIFs and if you have any questions, ideas or feedback please leave a comment below as it is always good to hear from you
Pete

